Quil is a Clojure and ClojureScript wrapper around Processing. Quil takes learning how to code within the context of the visual arts and applies 10X to it. (I say being a passionate Clojurian.)
With Clojure and its REPL comes the promise that you dynamically can tweak and form your sketches, as they are running. That’s what this is article is about. There is a Calva context, but things generally apply accross all Clojure editors/IDEs. I will assume you know some Clojure, but you should be able to follow pretty well regardless, because I also will try to keep this at a beginner’s level. My aim is to leverage Quil to try to explain things in a way that could help you ”see” how the Clojure editor relates to the Clojure REPL. (In case you haven’t yet ”seen” this.)
Let’s start with inspiring ourselves! Check this GIF out:
It shows Calva employing the Clojure REPL to modify a running Quil/Processing sketch. There are a few things happening there. The relevant ones for the purpose of this article are:
- The
draw-statefunction. It is being called by Quil 30 times per second (configurable via the:fpssetting on the sketch.) This function relies on thatstatehas been calculated before in the same tick. (You can see part of the function doing that at the top of the image). angleis locally bound from what we find instate. (angleis used to calculate the position of the circle.)- A namespace symbol
anglewith the value of the localangleis defined. (A. k. a. an ”inline def”) The reason we do this is that the REPL can’t reach the variables local to the function. - We evaluate the text
angleusing the command Calva: Evaluate Current Form which sends that form (the textangle) to the REPL and Calva picks up the result of the evaluation and displays it. (This is what could not have been done without the inline def). We do this a few times to show that it changes as the Quil engine keeps calling the function. - We evaluate some other forms where
angleis used as a parameter.
So far we have only been inspecting the sketch. Which is powerful. Then the real magic happens:
- We type a new version of the
draw-statefunction, modifying how theycoordinate is calculated. - We send the whole text of the new
draw-statefunction to the REPL, which evaluates it, leading to that a new definition of the function is ”installed” in the namespace. - The following tick, Quil will call our new function, resulting in that the circle movement starts following a different path.
Even though I have been coding Clojure in this Interactive Programming way for quite a while now, my mind is still blown! This way of working is why I know I will stay with Clojure for the forseeable future. It is nothing short of delightful. Yes, there are other environments/languages offering this (and even beyond), but none of them is as practical and soundly founded as Clojure is.
How to get there
There is a mindboggling feeling to be evaluating your program into existence. But, and trust me on this, none of this magic comes from Calva. It is the Clojure REPL at work. In theory that is all you need to know. I am writing this short guide anyway, because, on the Clojurians Slack, Leif Eric Fredheim made me aware that the Quil wiki instructions for how to get to a dynamic Quil workflow can lead a bit astray. Especially if you don’t know how to map the general REPL advice to the REPL UI that Calva provides.
As an example I have made a highly regular Clojure app, which is using tools-deps. I created it with deps-new. It’s a GitHub project template, available here: https://github.com/PEZ/a-quil-workflow
- Use the template (there is a green button for this at the top of the repository page) and clone it to your computer.
- Open the project root in VS Code and (assuming you have Calva
installed) use the command Calva: Start a Project REPL and
connect (a.k.a Jack-in) to get the REPL connected to your
editor.
- Select the deps.edn Project type
- Don’t select any alias
- Wait a few seconds for the REPL to be connected (the indicator in the status bar turns ”Calva orange” and the output window will also show when it is done)
- Open the
src/a_quil_workflow/core.cljfile and issue the command Calva: Load current file and dependencies
This will pop open a floating Java window with the example sketch running.
The relevant parts of the example project are:
- In
deps.ednwe declarequil/quil {:mvn/version "4.0.0-SNAPSHOT"}in the:depsmap. (We use this version because the ”stable” version depends on Java 1.8 and that would stop us from bringing in Box2D and nice things like that in our sketching.) It’s a trade-off, see this issue, and this issue too. - In
src/a_quil_workflow/core.cljwe define our sketch. This is what causes it to start when you load this file. ”Load the file” essentially means “send its contents to the REPL”. - In
src/a_quil_workflow/drawing.cljwe define the example sketch/drawing behaviour. It mostly configures the functions that the example sketch is using.
The sketch definition file
Let’s have a quick look at core.clj:
(ns a-quil-workflow.core
  (:require [a-quil-workflow.drawing :as drawing]
            [quil.applet :as qa]
            [quil.core :as q]
            [quil.middleware :as qm]))

(q/defsketch example
  :title "An example quil sketch"
  :size [500 300]
  ; setup function called only once, during sketch initialization.
  :setup drawing/setup
  ; update-state is called on each iteration before draw-state.
  :update drawing/update-state
  :draw drawing/draw-state
  :features [:keep-on-top]
  ; This sketch uses functional-mode middleware.
  ; Check quil wiki for more info about middlewares and particularly
  ; fun-mode.
  :middleware [qm/fun-mode])

(comment
  (use 'a-quil-workflow.drawing :reload)
  (qa/with-applet a-quil-workflow.core/example (q/no-loop))
  (qa/with-applet a-quil-workflow.core/example (q/start-loop))
  (qa/with-applet a-quil-workflow.core/example (q/random 10)))
The reason that we have the sketch definition in a separate file is
so that we shall be able to reload drawing.clj at will.
Because every time we evaluate the sketch definition, a new sketch
window will spawn.
There are also some convenience forms in the Rich comment block. (You
evaluate those with the Calva: Evaluate top level form
command, default bound to alt+enter. One of the forms
reloads the drawing namespace. You will probably not use
this much, because it is easier to re-evaluate definitions one by one in
drawing.clj. (It’s good to know about the technique as
well.) There is one form for stopping Quil from calling the
:update and :draw functions, and one for
starting the loop again. The last form shows how you can use quil
functions that need to be called in the context of an applet/sketch.
(Why quil.core/random needs this? I have no idea. Please
enlighten me if you know.)
The reloadable drawing file
Here’s drawing.clj, where we define the
:setup, :update, and :draw
functions referenced in the sketch definition:
(ns a-quil-workflow.drawing
(:require [quil.core :as q]))
;; defonce so that we can reload the `draw-state` function
(defonce calva-logo (ref nil))
(defn setup []
(q/frame-rate 30)
(q/color-mode :hsb)
(dosync (ref-set calva-logo (q/load-image "calva-symbol+logo.jpg")))
; setup function returns initial state. It contains
; circle color and position.
{:color 0
:angle 0})
(defn update-state [state]
; Update sketch state by changing circle color and position.
{:color (mod (+ (:color state) 0.7) 255)
:angle (+ (:angle state) 0.1)})
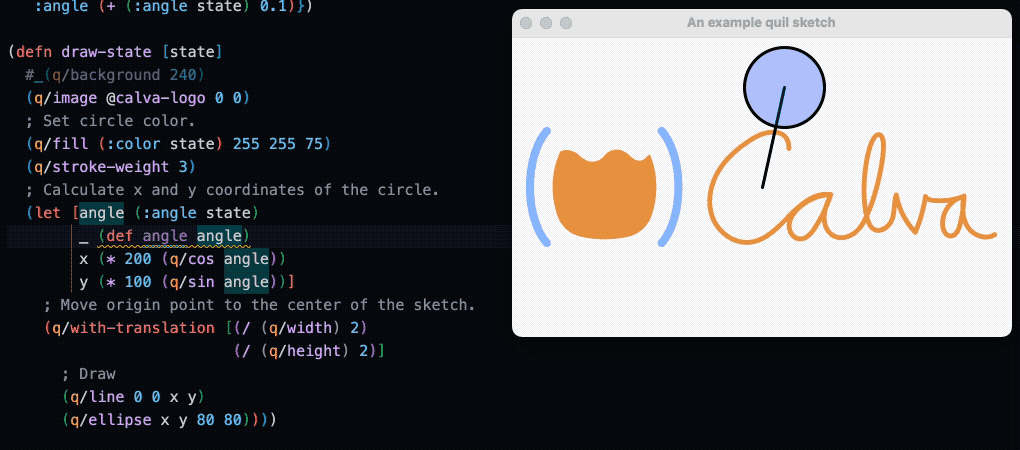
(defn draw-state [state]
#_(q/background 240)
(q/image @calva-logo 0 0)
; Set circle color.
(q/fill (:color state) 255 255 75)
(q/stroke-weight 3)
; Calculate x and y coordinates of the circle.
(let [angle (:angle state)
x (* 200 (q/cos angle))
y (* 100 (q/sin (* 3 angle)))]
; Move origin point to the center of the sketch.
(q/with-translation [(/ (q/width) 2)
(/ (q/height) 2)]
; Draw
(q/line 0 0 x y)
(q/ellipse x y 80 80))))
(comment
;; Evaluate these using the custom commands shortcut `ctrl+space t`
(q/current-fill)
(q/frame-rate 60)
[(q/mouse-x) (q/mouse-y)])Note that the image file is read in setup and the
resulting Quil image is then used in draw-state. We use a
ref to achieve this and we define the symbol
calva-logo using the defonce macro, which will
make it only be defined the first time the
(defonce calva-log (ref nil)) form is evaluated. If we had
used def here we would not be able to reload the file,
because setup is called only once when the sketch is
”started”.
Two notes about this:
- We don’t really need to reload the file. Re-evaluating the definitions in it as we modify them is enough. But I sometimes confuse myself and wonder if the file contents represent the running program, and then it’s nice if things are setup so that I can save and reload the file.
- What if we want to change/update the image? Can we do this without
recreating the sketch? Yes. Like so:
- Modify the form to use
definstead - Evaluate it
- Modify it back to use
defonce - Modify the
(dosync (ref-set ...))form in thesetupfunction - Evaluate this form as well (only the
(dosync ...)form, not thesetupfunction)
nil, the sketch will crash every tick. If you can stand that thought, though, no need to stop/start. 😄 - Modify the form to use
The workflow when updating the sketch is like what is shown in the
GIF above. We modify the functions and re-evaluate them
(alt+enter with the cursor somewhere inside the function).
Your REPL workflow will benefit from factoring the sketch into many
small functions.
FDD: My development workflow is full of failures. Small functions in combination with the REPL makes it small failures. When I tried to describe to Michiel Borkent how I fail myself forward, he immediately dubbed it Failure Driven Development. He’s good with naming!
Workflow shortcuts
As an astute reader you now wonder about those Rich comments at the
end of drawing.clj, right? I’m happy you do! The example
project has some Calva configuration that I’d love to tell you about.
Here’s .vscode/settings.json:
{
  "calva.customREPLCommandSnippets": [
    {
      "key": "e",
      "name": "Evaluate Current Form with Quil Applet",
      "snippet": "(quil.applet/with-applet a-quil-workflow.core/example $current-form)"
    },
    {
      "key": "c",
      "name": "Call Current Form with Quil Applet",
      "snippet": "(quil.applet/with-applet a-quil-workflow.core/example ($current-form))"
    },
    {
      "key": "t",
      "name": "Evaluate Current Top-level Form with Quil Applet",
      "snippet": "(quil.applet/with-applet a-quil-workflow.core/example $top-level-form)"
    },
    {
      "key": "n",
      "name": "Stop Quil Loop",
      "snippet": "(quil.applet/with-applet a-quil-workflow.core/example (quil.core/no-loop))"
    },
    {
      "key": "s",
      "name": "Start Quil Loop",
      "snippet": "(quil.applet/with-applet a-quil-workflow.core/example (quil.core/start-loop))"
    },
    {
      "key": "r",
      "name": "Reload drawing namespace",
      "snippet": "(use 'a-quil-workflow.drawing :reload)"
    }
  ]
}
These set up a few Custom REPL Commands:
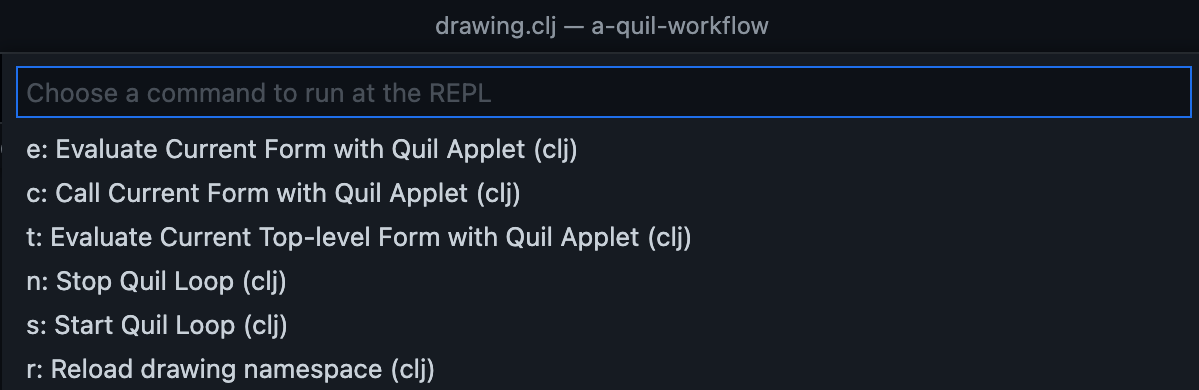
- Evaluate Current Form with Quil Applet: For calling
quil.corefunctions that need the example sketch context. You might be using something like(q/random 100)in some function. With this custom command you can evaluate it without having to wrap it in thewith-appletstuff, just place your cursor in front of, or behind the form and pressctrl+alt+space e(that’s what `“key”: “e” does there). - Call Current Form with Quil Applet: For calling
(wrapping in parens) ”bare” symbols. Good if you have cmd/ctrl-clicked
on some
quil.coresymbol and find some thunk defined in that file that you want to see what happens if you call it. - Evaluate Current Top-level Form with Quil Applet:
Similar to
e, but for top level forms. Extra convenient in Rich comment blocks (ha! you thought I had forgotten about those again, right?). - Stop Quil Loop: Stops the animation of your sketch. (Which might be spewing stack traces in the output window.)
- Stop Quil Loop: Starts the animation of your sketch.
- Reload drawing namespace: I don’t know when you would need this, but added it for good measure.
If you forget about which shortcut binds to which command, just use
ctrl+alt+space space to bring up a menu with all the custom
commands.
I encourage you to try this project out and giving the custom commands a spin. Define some of your own. Please get inspired by them and copy them to your Quil projects (you’ll need to modify them, of course). And why stop with your Quil projects? You probably have more projects that could benefit from some workflow convenience like this. I would love to hear from you about neat custom commands you come up with.
Happy coding! ❤️
I hope you have learnt at least something about the toolbox at your disposal when you take command over your programming workflow.
And I hope to see you in the #calva and/or
#quil channels on the Clojurians Slack!
Peter Strömberg 

Peter Strömberg is an autodidact programming nerd living in Stockholm, Sweden. He has been all over the (coder) place for a long time. After some 20 years in the profession he made an attempt to leave it for another passion of his: Product. That attempt ended when Peter was introduced to Clojure and he felt how it gave him back all the joy of programming, and then some.
You can contract Peter for remote Clojure/ClojureScript gigs up to 80% of an FTE. The other 20% Agical pays him to spend doing open source work. Most often this is about maintaining Calva, a popular Visual Studio Code Clojure IDE extension which Peter created 2018.
- E-mail: peter.stromberg@agical.se
- LinkedIn: Peter (PEZ) Strömberg
- Twitter: @pappapez